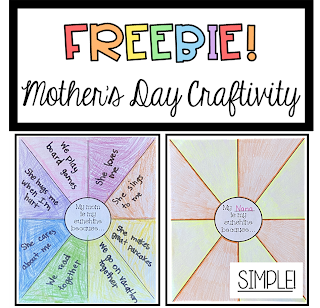
Have you noticed all of the Mother’s Day crafts for kids out there? It’s like an unlimited number of Mother’s Day craft ideas. When I first started teaching, I would plan these elaborate Mother’s Day activities for students in my class. Each year, my class made this Mother’s Day card that would fold out into a long flower in a pot.
Then I became a mom my self. Moms, do you know where I’m going with this? It was at that point that I realized moms are already overwhelmed with “stuff” from school. The last thing they want is a 12X12 project that folds out to a 2 foot flower pot! Yes, it’s cute. BUT (and it’s a big but here) it takes up so much space and moms feel like they have no choice but to keep this precious project on display for a long while. Plus, it doesn’t end there! After you’ve kept it on display for the appropriate time period, what do you DO with it?
That’s why I was looking for a simple Mother’s Day gift that moms will actually WANT to keep forever? Are you in the same boat? I’ve got you!
I started really thinking about myself as a mother. What would bring the tears on Mother’s Day morning? I decided that any Mother’s Day writing would be a winner in my book. The best present a mother can ask for is the loving words of appreciation from her child. Are you with me? I know I could use an extra “thank you” or “You’re the best!” here and there! That’s how I landed on this Mother’s Day card / art activity.
Also, I would want something that I could hang on the fridge and easily slide into their memory boxes a few weeks later. As a teacher, I knew I wanted a no-prep Mother’s Day activity that wouldn’t take up an entire day. I’m part time this year, so my hours at school are precious to me! The best part about this project is that it’s such a simple Mother’s Day craft that DOESN’T require you to get out the entire craft closet of your classroom!
Here’s an up-close of the one my sweet girl made for me:
I could see this Mother’s Day writing activity used by all ages. Children in preschool and kindergarten can use the spaces of the sun to draw pictures. Then, either the child or the teacher can add labels to the pictures they’ve drawn.
Writing:
If you’re using this as a Mother’s day activity for preschool or kindergarten students, they could:
1. draw pictures in each space of the sunshine
2. label the pictures themselves or the adult can label them
If you’re using this as a Mother’s Day activity for Elementary and Upper Elementary students they could have a little more flexibility for how they want to use the spaces. They could:
1. write words of appreciation.
2. use the spaces to write an acrostic poem using the word SUNSHINE.
3. be creative to fill the spaces however they choose!
Decorating:
This really is teacher preference. Here are some ideas to get you started:
You can keep it simple and stick with basic art supplies – crayons, markers, etc. I know my class really enjoys the look when they outline in marker and color in with crayon. They like the finished look it gives. In my example, I used Crayola Twistables to outline and then fill in.
My favorite way is watercolor! Here’s how I do it:
1. Use pencils to fill in all writing.
2. Use a Sharpie to trace over the pencil.
3. Use water colors to paint over the Sharpie. After it dries, the writing will pop against the light watercolor background!
I should also tell you that this isn’t the only gift my students give their moms. They also make a sweet little bracelet to take home with their Mother’s Day card. I usually bring in wrapping paper and they get to wrap it up super fancy like a jewelry store. Then, they’re ready to go with the perfect Mother’s Day gift!
If you’d like to use this no-prep mother’s day activity with your students, you can find it HERE!
Have fun and let me know how it goes!


